The modern Internet is full of many malicious robots and crawlers such as malware bots, spam email bots, or content scrapers that scan your website in many ways. They do this to discover potential website weaknesses, collect email addresses, or just steal content from your website. Many of these bots can be identified by their signature “user-agent” signature string.
They may not necessarily be bad or spam, but they also may not add value to your business. Imagine if most of your hits are coming through unwelcome user-agent or spam referrers and you think your site is getting good traffic, when in fact they are useless and creating downtime for the website.
As the first line of defense, you can try to prevent malicious bots from accessing your website by blacklisting their user-agents in a robots.txt file. Unfortunately, this works only for well-behaving bots that are designed to obey the robots.txt. Many malicious bots can simply ignore the robots.txt and scan your website at will.
This post assumes that you already have an NGINX or Apache web server up and running.
If you already have a list of user-agents and referrers that you want to block, let us get it started.
NGINX
To configure the user-agent block list, open the nginx configuration file for your website. This file can be found in different places depending on your nginx setup or Linux distribution (e.g.: /etc/nginx/nginx.conf, /etc/nginx/sites-enabled/, /etc/nginx/conf.d/).

Let us say you are getting a lot of auto-requests with the following user-agent strings, and you decide to block them.
- Virus
- BadSpider
- netcrawl
- npbot
- malicious
Once the configuration file is open, locate the server section and add the following if statement(s) somewhere within the section.
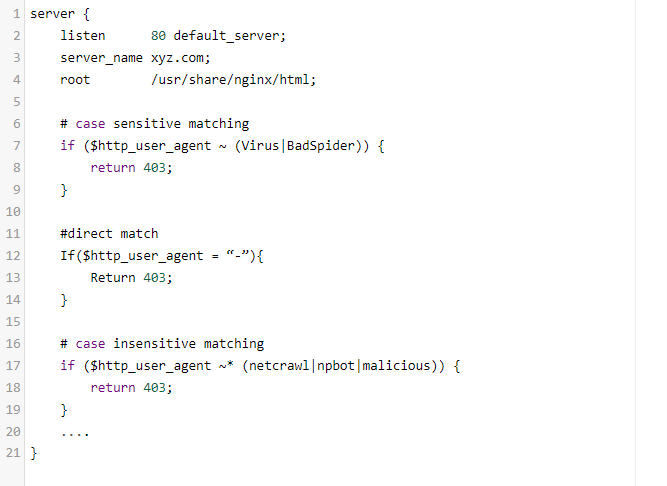
As you can guess, these if statements match any bad user-agent string with regular expressions and return 403 HTTP status code when a match is found.
$http_user_agent is a variable containing the user-agent string for the HTTP request. The ~ operator performs a case-sensitive match with the user-agent string, while the ~* operator performs a case-insensitive match. The | operator is a logical-OR, so you can put many user-agent keywords in the if statements and block them all.
The following example, which should fall under the location block, will allow you to block requests from referrers.

After modifying the configuration file, nginx must be reloaded to activate the ban:

Apache
To block user-agents in Apache, you can use the mod_rewrite module. Make sure the module is enabled:
![]()
Assuming .htaccess is already enabled on your server (it is on most servers running Apache), add the following near the top in either the .htaccess file or the respective .conf file.
If you have multiple sites configured and want to block a specific URL, you may want to put them in the respective VirtualHost section.
The following example will block any requests containing a user-agent string of badcrawler, badbot, or badagent.

If you want to block multiple User-Agents in .htaccess, you can combine them in one line like this.

Alternatively, you can use a SetEnvIfNoCase block, which sets an environment variable if the described condition is met. This can be useful if for some reason mod_rewrite is not available.

(If apache is behind AWS LB or GCP LB)
To block specific referers, use use %{HTTP_REFERER} instead of %{HTTP_USER_AGENT}. The below example will block by the referer names foobar, MaliciousBot, and SpiderBot.

As usual, restart the Apache server and test the results.
![]()